VSDC for novices: A simple but effective video editor hidden behind an object-oriented structure
VSDC is oft-mentioned as one of the options on hand for beginners looking for free video editing software. On the one hand, it is amazing value for money (or the lack thereof) in both its free and paid versions, because it offers ample creative control while simplifying colour correction and text / image animation conveniently for novices. On the other hand, it has also gathered much backlash for having a user interface and workflow that is very different from most professional-grade video editing tools.
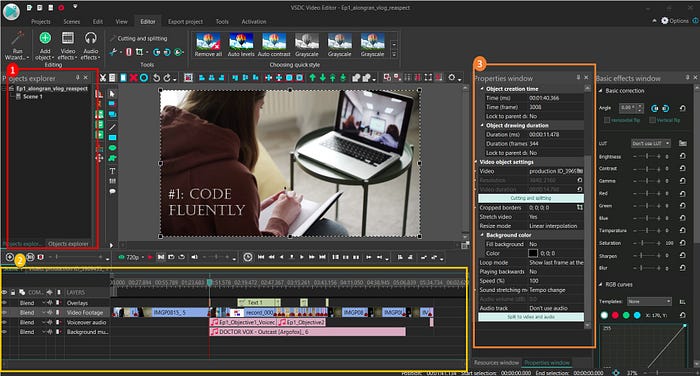
Most video-editing software packages mimic a filmmaker’s workflow (import — edit — effects — compositing — colour — audio). In contrast, VSDC is a thinly-disguised wrapper around an object-oriented programming suite that performs the same tasks, but with a workflow that makes more sense to a coder than an artist. Therefore to be successful at creating effective video with it, you need to be familiar with its hierarchy:
- Project — A project is a single video, be it a 30-minute advertisement or a full-length feature film. Each project is a separate file in VSDC.
- Scene — A project comprises one or more scenes, each of which is a set of video / audio / image clips that you want to edit in a single timeline. Scenes are found in the Scene Explorer (box 1 in illustration).
- Object — These are the media that you want to manipulate, i.e. video, audio, text, and image files. You can find a list of objects in the Object Explorer (2nd tab in illustration box 1), and also arrange them on the timeline (box 2 in illustration). Additionally, you can also control many characteristics of your media (e.g. video speed, audio volume gain, aspect ratios, and splitting of audio and video) in its respective Properties box (box 3 in illustration).
- Effect — You can add effects such as transitions, colour grading, normalizing or transforming audio, etc to an object. This is where VSDC is very helpful for novices because it has useful pre-set colour filters as well as pre-sets in its RGB curve menu. However, to access the full richness of the effects offerings, you have to go into the respective effect’s properties and manipulate it, in the same manner that you manipulate an object’s properties by selecting it and then browsing the menus in the Properties box.
- Mask — You can apply an effect to a specific area of the screen, e.g. pixelating a car licence plate, a child’s face or a computer file path, to protect your privacy. To do this, add an image to a visual effect and use it as a mask (via the Properties box).
From the above, you can discern that the 3 numbered boxes in the screen shot are the key work areas that you must familiarize yourself with to make full use of VSDC’s functions. In particular, you can unleash a lot of creative control if you understand the hierarchy of the various tabs in box 2.
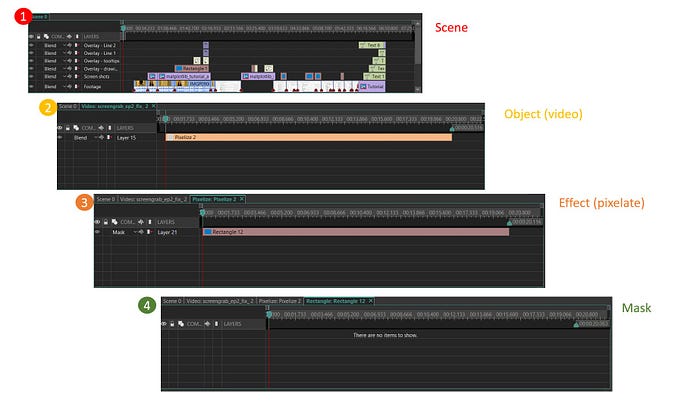
Mostly, VSDC is confusing when you don’t realize that the timeline is nested. In the screen shot above, timeline 1 (the Scene) is common across all nonlinear editing interfaces. However, when you click on any object in the timeline, you will get a second tab corresponding to that particular object (timeline 2 in picture). This object (a video) has an effect (Pixelate) applied to it, and if you click on the Pixelate item inside the video’s timeline, a third timeline will pop up belonging to that Pixelate effect. The sequence carries on for each successive layer in the hierarchy. These timelines allow you to click on key frames and then adjust the properties (in the Properties box) at specific points in time.
It’s a pity that VSDC’s interface may drive many a novice to give up before they can unlock its main benefit, which is that it simplifies text and image overlays and animation to make editing tutorial videos a breeze. For example, you may want to present a slide with overlays that wipe in as you speak. In a traditional video editing suite (Kdenlive is the one pictured below), you need to create the text as a separate media clip. Then, you need to use the Effects tab to design a keyframe animation to choreograph its movements and transitions.
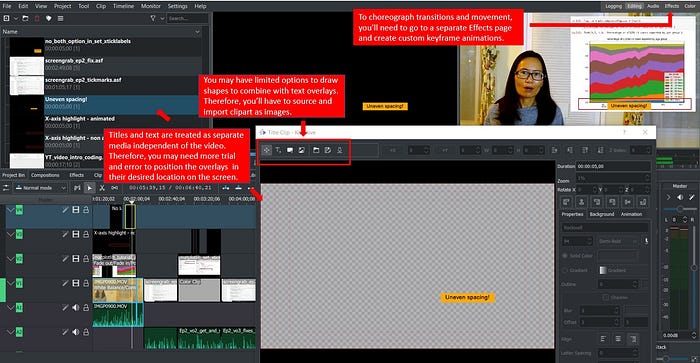
In contrast, VSDC operates very similar to PowerPoint for adding text and image overlays. You can position and resize the text and images directly in your preview window. The workflow for adding stock transitions is also very PowerPoint-like, where you can go to “Video Effects” → “Transitions”, pick a transition, and then customize the transition’s properties in its Properties box.

If you want to animate overlay objects in ways not covered by the standard transitions, then you will need to overcome the counter-intuitive positioning of the “Movement” functionality. Unlike other Objects which you place directly into a Scene, a “Movement” is classified as an “Object” in VSDC when it’s actually at the same level in the hierarchy as the Effects, i.e. it can only be applied to an Object. That’s unfortunate, as it probably reflects the underlying code structure more than it does a user’s thought process.
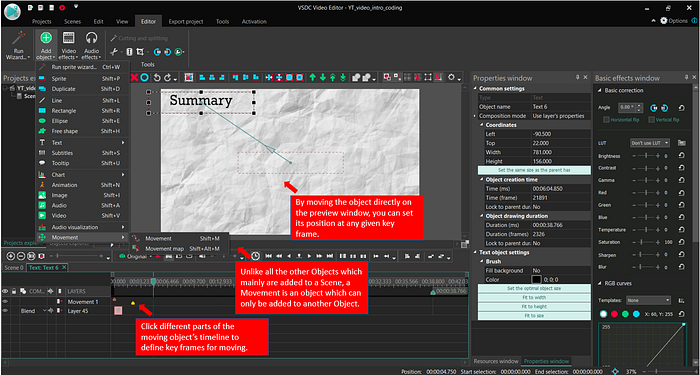
However, once you locate the “Movement” menu option, you can then set the object’s position over time by clicking any given point on its timeline and then dragging and dropping the object at its desired position directly on the preview screen. Hence, VSDC does a great job of performing keyframe animation in a way that beginners can understand without learning a lot of terminology.
Similarly to the animation process, VSDC enables a novice to navigate colour correction without having to master complex technical knowledge. By using a combination of automated pre-sets and a simple colour wheel, I was able to mitigate the strong yellow light in this scene without any technical knowledge of colour theory.
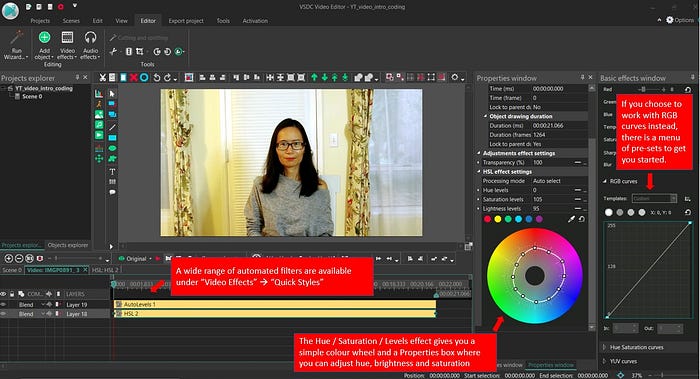
In contrast, traditional video editing software offers much more manual control, but at the expense of usability for a novice. People who know colour theory and understand the terminology will be at an advantage to leverage the traditional colour grading interface of a more sophisticated video editing software. As you can see, I attempted to colour grade the exact same footage in VSDC and Kdenlive, and achieved more natural looking results in the former because I was able to leverage pre-sets.
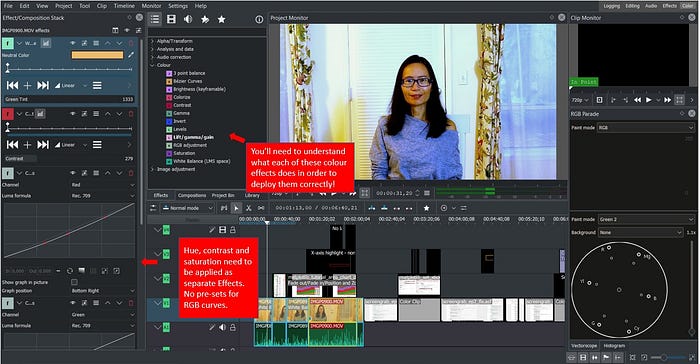
In conclusion, the best choice of free video editing software will depend on your eventual goals. I chose to compare VSDC and Kdenlive because they are the least resource-hungry options, and thus able to make video editing possible for new content creators on a budget.
If you want to focus on your content and see video as a means of communicating your ideas, rather than wanting to explore editing as a craft of its own, I hope that this article will help you to overcome the teething problems of VSDC and therefore give it a fair chance. Particularly, if you are a heavy PowerPoint user, VSDC will become intuitive and efficient for you.
On the other hand, if you aspire to become a professional filmmaker and are more focused on creative editing work, you’ll probably want an interface with a clip monitor and audio mixer. VSDC’s main weakness is that it doesn’t have a media pool to save your clips, so if you delete any clip from the timeline, you will have to re-import it if you want to use it somewhere else. This is a bigger drawback for someone experimenting with creative clips and cuts, whereas people producing targeted tutorial / vlog / documentary content might not mind as much.
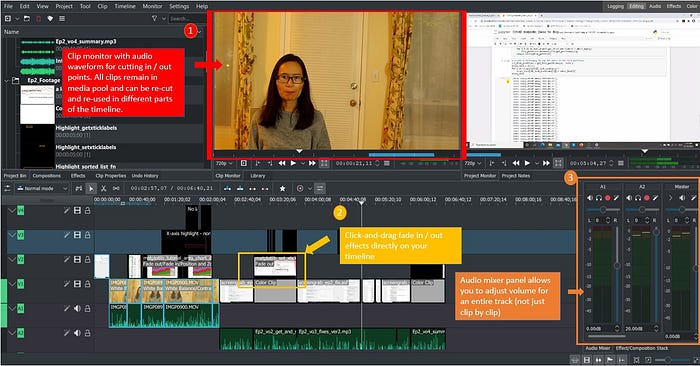
Kdenlive takes up about the same disk space on your computer as VSDC, and also creates media files that are half the size of VSDC’s, so it is a natural option if you have a low-spec computer. If you have a higher-spec computer, then more sophisticated options like DaVinci Resolve and HitFilm Express will be available to you as well. However, all of these will involve a steeper technical learning curve in the art of video.
Hope that this helps you to make the right choice of free video editing software for you!
